Saturday 29 September 2012

Harvest sheaf

I made my first harvest sheaf 4 years ago now. It didn't look great and I wasn't confident in the quality of the bread so no one got to eat it.
The second one I made was very bulky and didn't look as good as I wanted but it was edible.
I didn't make one last year, it all seemed a bit of a hassle.
With my lovely new mixer, I decided to give it a go, maybe one last time.


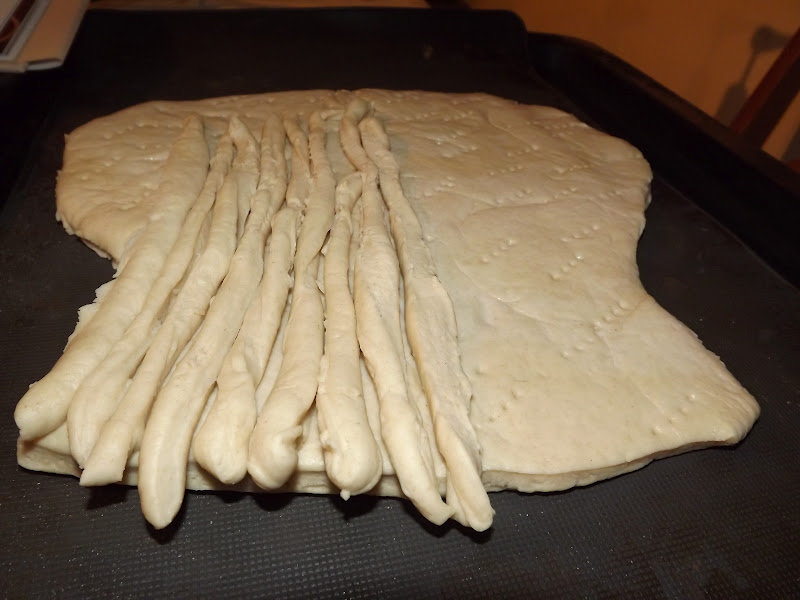
It was all made a lot easier because I made the dough in one batch where as with the bread machine I had to do it in two batches.


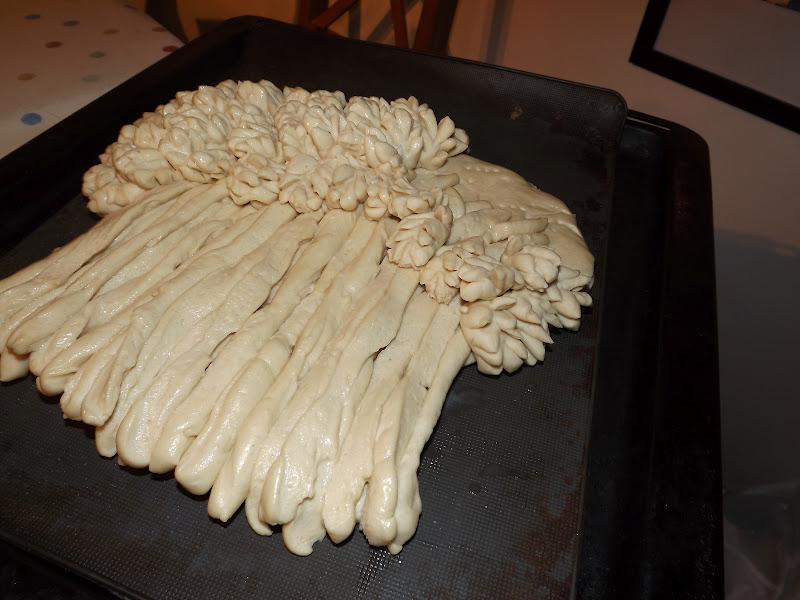
Covered in egg and milk wash.


Bake at 220 for 15 minutes then take it out, lower oven to 180 and put more egg wash on. Bake for another 30-35 mins.

This took me a couple of hours from start to finish but, to me, it's what they probably call "a showstopper" on the telly.
When I was a little kid, in primary school one year, we had one. I don't remember the whys and wherefores but I remember it, it was probably much bigger than mine because I know the teachers cut it up and shared it around the whole school.
I'll take this to church tomorrow and do the same thing.

x


Thursday 27 September 2012

My lucky day

Since my bread machine has been giving me problems, I've been dropping not so subtle hints to Dave to get a mixer. I do bake an awful lot of bread and though it would have been cheaper to get another bread machine, the other 3 (yes 3!) I've had in the past have all developed the same problem.
The first 6 months or so they gave me no problems, then for no apparent reason, it starts having black marks throughout the dough, start mainly from the dough blade. I did a bit of research on the web and it's a common problem with bread machines

After giving the bread machine another try this week and it happening, Dave just said that I should probably try getting a mixer. Well, he didn't have to tell me twice!

I went on Amazon on Tuesday and it came lunch time today.


Have already christened it by making some bread.

I'm a very lucky.

x


Monday 17 September 2012

Blackboard paint

Blackboard paint is something I love working with.
I love that you can use on most anything and it's really not that expensive.
About 6 years ago, I decorated Leah's bedroom and painted her a chalkboard on the wall.


It was a real labour of love doing the border, I printed the flowers off on sticker paper and cut each one out, pretty fiddly work.

I've had a pot of black blackboard paint for a couple of months and have finally got around to using it.

Here's what I did.

Frame from Ikea and paint from B & Q


Three coats of paint on the mirror side and two coats on the back.


Plain wood embellishment from  craft shop.


Painted with white acrylic paint.


A nice even coating of mod podge.


Sprinkled with fine glitter straight away, whilst the mod podge still wet.
I did a second coat after the first had dried.


I stuck it to the mirror frame using super glue.
Just one or two more jobs to do on this one.

x


Thursday 13 September 2012

My signature bread

Several years ago, when I first was given a bread machine, I wanted to be able to make a foccacia.
This bread isn't strictly speaking a foccacia, it just seemed to develop into something else.
What guided me along the way was people's responses to it, if they made happy noises about it I was knew I was moving in the right direction.
Some people call it "Maggie Bread". I'm going to (in the style of the Great British Bake off) call it my signature bread.


I take 2 garlic cloves, some rosemary and a teaspoon of rock salt and give them a good bashing in a pestle and mortar.

.

 The rock salt really helps to break down the garlic and rosemary but regular salt works too.


Add 2 tablespoons of olive oil.

In the bread machine (or just in a bowl if you don't have one) put 270ml of warm water, 1 tablespoon of sugar and the seasoned oil, 3 bread machine cups (500 grams) of strong bread flour and 2 teaspoons of fast acting dried yeast.

Sadly, my trusty bread machine is on it's last legs. I used it to do the initial mix and then take it out. If you are lucky enough to have a fully functioning bread machine, just put it on the dough setting.


It's at this stage, I find Chris useful to do the kneading.


For 10 minutes.


If you've seen bread made on the TV, then you've probably seen this technique of stretching out the dough then pulling it back on itself. 


Here's Chris getting a bit cheffy.


I use a round 8 inch silicone cake tray.


I punch the dough into the tray, spreading the dough right up to the sides.


Using a clean finger, poke the bread....a lot.
I drizzle Tescos finest garlic infused oil but regular olive oil will do.
Sprinkle with rock salt.


Now leave in a warmish place to prove.
I don't bother to cover it as it is well oiled.


At least half an hour later.
Then in a preheated oven at 220 for the first 10 minutes then down to 200 for another 10-15 minutes, depending on how brown you like it.


Happy baking.

x


Wednesday 12 September 2012

Decoupage - covering a stool

It was sometime last year that I bought a plain white stool for £5 from the bargain corner at Ikea.
I had some papers from http://decopatchstore.co.uk/ and using their decopatch glue, tearing up the papers and lining up the pattern I covered the stool.


It looked great and I was dead proud and then Leah was messing around with nail polish and remover.


Not quite so impressive.
It's been like this for months and finally today I got around to sorting it out.
Our Summer holiday, we were in Cornwall and we bought an OS map and it was invaluable when it came to all the little country roads. Me and that map had a real close working relationship that week.
It occurred to me that I could put it to use rather than just leaving it in the car, I wanted to give it a new lease of life.
Here's how.

Firstly, I sanded the stool to prepare the surface.
I placed the stool, seat side down on the map and using a ruler drew around it, leaving about an inch extra from the edge for the overhang.


Mod podge, map and sponge brush (I find it easier to use with mod podge and covering a large area).


Being quite generous, I covered 1/3 of the stool with mod podge.


I carefully placed the map on the glue and gently using the handles of some scissors, smoothed down the creases.


I lifted the map back and repeated the process.


I've found this technique works for me.


The map was now glued to the stool, no turning back now!
At this point, I took the time to work on smoothing down the creases as much as I could.
It's not going to be super smooth but it was worth doing what I could.


Now for the sides and the  overhang.


I cut through each corner.


I used a very generous amount of glue here and used my fingers to smooth the map into place. It's messy but it was worth paying close attention to getting it fix in place and smoothing down the corners.


Now I could put two coats of the mod podge glue over the map to seal it, making sure I brushed in one direction (other wise it just looks messy).

The whole thing took 30mins from start to finish.
I like that we now have a reminder of a great holiday on what is something we use everyday.

x